July 23, 2022
How To Export & Import a WordPress Blog and All Images
By Todd Farino
One of the most significant challenges when migrating a website or revamping an old one lies in the migration of your WordPress blog. For many developers in the website design process, this has been an enduring source of frustration. Exporting and importing a blog might seem like a straightforward process, but certain challenges, especially concerning images, often emerge. Despite numerous attempts, images simply refuse to import along with the blog. This issue becomes even more critical considering that most blogs contain hundreds of images, each with a featured image. Ensuring a seamless transfer of all these photos is vital to avoid any adverse impact on your Google SEO rankings. In this article, I will guide you through the steps to successfully migrate your blog and its associated photos to your new site or hosting server, safeguarding your valuable content and preserving your online presence.
Steps For A Seamless WordPress Blog Import and Export With Images
Migrating The Blog
- To ensure a smooth migration process, it is essential to have both sites running the latest version of WordPress and the most recent theme update. Additionally, I highly recommend updating any installed plugins.
- Prior to initiating the blog import/export, verify that the admin usernames on both sites are identical, and their passwords match. This step is crucial for the WordPress import/export operation to seamlessly access the media during subsequent stages of the process.
- Proceed to the original site housing the blog you wish to export. Within the dashboard, navigate to Tools >> Export. Select the option to export ALL posts and then click on "download export file" to initiate the export process.
WordPress Dashboard >>Tools >> Export
4. Now that you have the blog file, go to the new site WordPress dashboard. Select Tools>> Import. It will ask you to select which importer to install as a plugin on your site. Select WordPress and click on “Install Now.” This will install the import plugin and then you can upload your blog export from the original site. It will ask you who to assign the blogs to for the new site. Make sure you assign them to the same admin on the original site. The admins have to match.
5. After you have successfully imported the blog, or anything for that matter, you will see the following message (image to right)
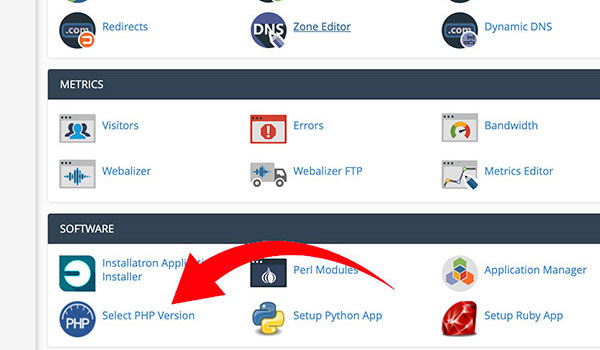
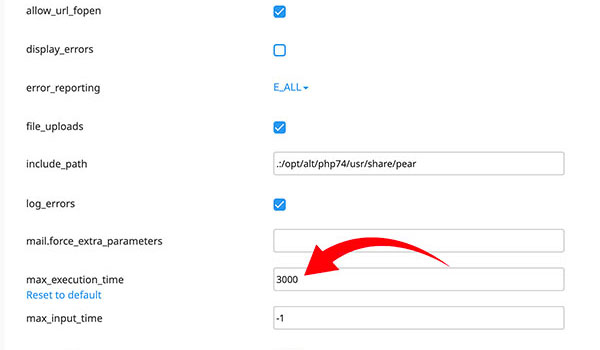
6. Before proceeding further, it is imperative to take measures to prevent your hosting server from timing out prematurely. Typically, hosting servers have timeout settings ranging from 30 seconds to 300 seconds. However, for a seamless upload of blog photos, we recommend extending this timeout period to 3000 seconds. While this step is not an absolute requirement, I strongly advocate implementing it if feasible. If you possess access to your hosting account, please log in and access your Cpanel. Then, click on "Select PHP Version" and proceed accordingly.
7. In PHP Options, look for max_execution_time and update it to 3000 (Seconds). It should autosave. After that, close your hosting and go back to the original site to start the export of media.
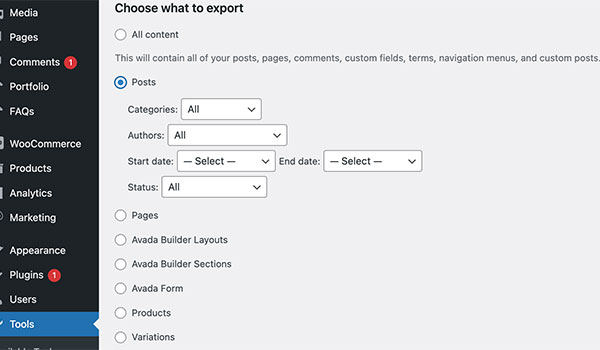
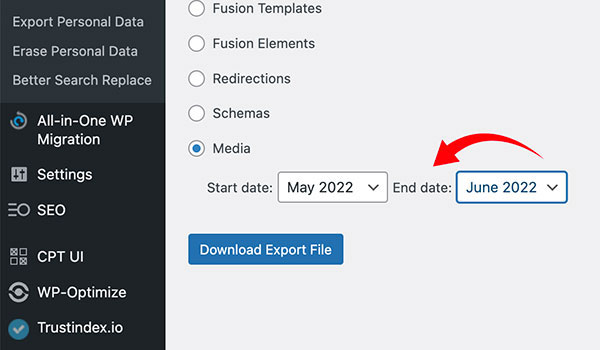
8. On the original site, go to Tools>> Export. In the list, this time we choose media. For this export option, WordPress will ask for a date range. You will input a start and end date for the export. They ask for the date range because trying to export all your images at once could cause both web servers to crash or simply timeout. Based on the number of photos you have on your site, that will determine how many months you can grab at once. I would recommend starting with the first month (the very first images) and only ending on the next month. Like this: (image to the right)
9. After you download the export file (xml), go back to the new site and select Tools>> Import and select your file for import. Before the import begins, WordPress will ask which user would you like to make the owner of the new imported media. ALWAYS CHOOSE THE SAME ADMIN that is on the original site. Make sure you check the box for “Download and import file attachments”. Click submit and wait.

10. Depending on the size of the download, it could take 1 to 3 minutes. Sometimes more. If you get a 404 error, especially if it comes quickly, just repeat step 9. It shouldn’t happen more than twice and if it does, you have to look at your hosting because it could be overloading your processing capacity, but that is rare. Even if it happens 2 minutes in, repeat step 9 with the same file. It will not duplicate image in your media library.

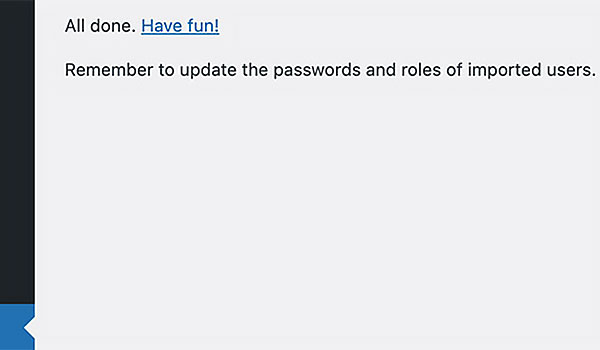
11. Once you see the message, “All done. Have Fun!”, you have completed that import. Next, go to the media library and check to see if new media files were added by viewing the total number of media items. You can also, search by going to the last images because if you imported the earliest images, they will be the oldest in your media folder.
12. Delete any images you don’t want, like old web site images that do not pertain to the blog itself. This will help to keep your media file clean and lite.
13. Repeat Steps 8-12 until you have grabbed all the months/years of your blog. You can try taking more months, maybe 2-3, but if it causes timeout errors, just reduce the number of months that you export.
Get Expert WordPress Blog Migration With Crown Marketing
This method is the foolproof approach to seamlessly transfer all your media from one site to another while ensuring that the image meta data remains intact and correctly corresponds to its respective blog post. The import/export operation preserves the files entirely, making it a critical aspect of the process.
While it may result in a surplus of images, encompassing all website images, the primary objective is to execute the blog migration without adversely affecting its design or SEO performance.
I must confess that I have successfully executed this operation on blogs containing over 500 images within their media files. Subsequently, I deleted approximately 100 unnecessary images to suit the new site. Indeed, moving a blog can be a formidable undertaking, leaving no room for error. It is imperative to transfer the blog along with all its associated images, including the featured ones, as their omission can significantly impact your SEO rankings.
For more invaluable tips and insightful information, feel free to explore our marketing blog now.
